
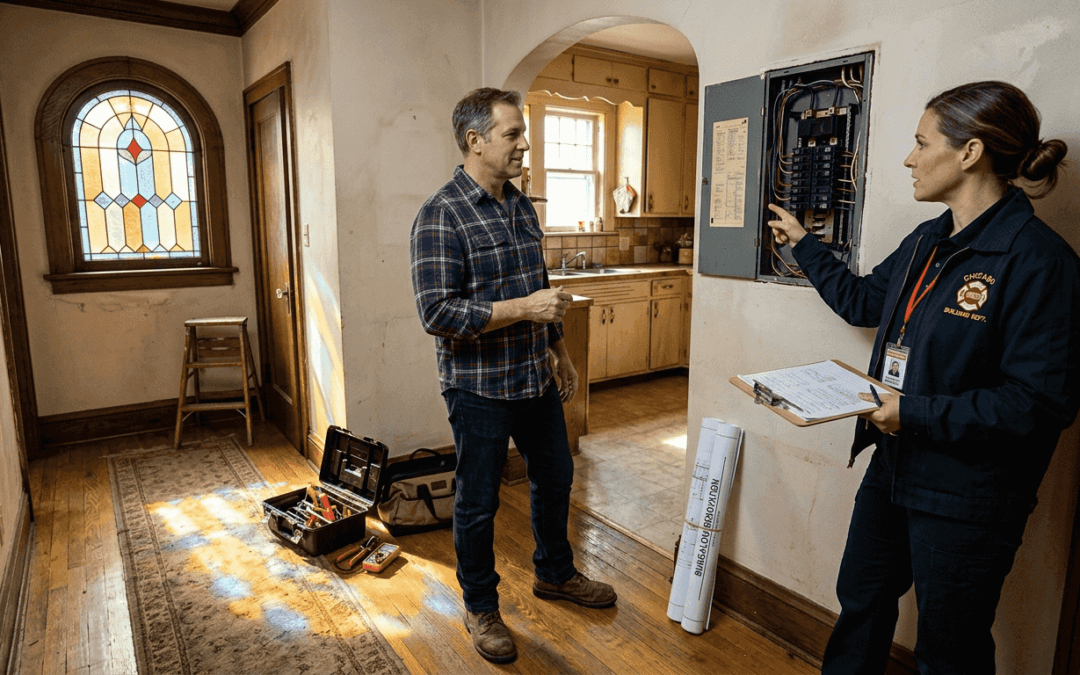
Signing a renovation contract doesn’t guarantee flawless workmanship. Many Illinois homeowners discover defects after construction wraps, leading to costly repairs and frustration. This guide equips you with a practical framework to understand quality standards, inspect workmanship at every phase, verify contractor credentials, and use professional inspections strategically. You’ll learn how to spot red flags early, communicate effectively with your contractor, and protect your investment throughout the renovation process.
Table of Contents
- Understanding Illinois Building Codes And Renovation Standards
- Key Indicators Of Renovation Quality To Look For
- Common Misconceptions About Renovation Quality
- How To Choose And Verify Reliable Contractors In Illinois
- DIY Vs. Professional Inspection: What Homeowners Need To Know
- When And How To Inspect During Renovation Phases
- How First Solution IL Supports Quality Home Renovations In Illinois
- What Are The Top Questions Homeowners Ask About Inspecting Renovation Quality
Key takeaways
| Point | Details |
|---|---|
| Illinois building codes set legal quality baselines | Illinois residential renovations must comply with the Illinois Residential Building Code, which sets minimum standards for construction quality and safety to be legally enforceable. |
| Visual and tactile inspections reveal early defects | Using flashlights and moisture meters during renovation phases helps detect hidden issues before they become expensive problems. |
| Verified contractor credentials reduce defect risk | Licensed contractors reduce renovation defects by 40% in Illinois through proven expertise and accountability. |
| Staged professional inspections catch hidden problems | Third-party inspectors assess critical phases like framing and rough-in utilities to identify structural issues before they’re concealed. |
| Clear contractor communication prevents disputes | Documented estimates, change orders, and progress reports create transparency that minimizes misunderstandings and delays. |
Understanding Illinois building codes and renovation standards
Illinois residential building codes create the legal foundation for renovation quality. These regulations enforce minimum safety and structural standards that protect homeowners from substandard work. Understanding these requirements helps you recognize when contractors cut corners or ignore compliance obligations.
Contractors working on residential projects must hold valid Illinois licenses and maintain minimum insurance coverage. These legal requirements aren’t optional. They directly affect your renovation’s durability and your protection if something goes wrong. Before signing any agreement, verify your contractor meets these standards.
Permits and contract clauses play essential roles in quality assurance. Permits trigger inspections by local building officials who verify code compliance at critical stages. Clear contract language specifies materials, timelines, and quality expectations, reducing ambiguity that leads to disputes.
Key compliance elements include:
- Foundation and framing specifications that meet load-bearing requirements
- Electrical and plumbing installations following National Electrical Code and Illinois Plumbing Code
- Energy efficiency standards for insulation, windows, and HVAC systems
- Accessibility requirements for bathrooms and entryways when applicable
Navigating commercial renovation permits differs from residential projects, but the underlying principle remains: compliance protects your investment. Whether you’re tackling a kitchen remodel or a whole-house renovation, understanding these standards helps you ask informed questions and spot potential violations early.
Following Illinois codes reduces your risk of costly defects and legal issues. When contractors ignore regulations, you inherit liability for non-compliant work. Future buyers may discover violations during home inspections, forcing you to pay for corrections years later. Investing time to understand these standards now saves thousands in potential rework and legal fees.
Key indicators of renovation quality to look for
Identifying quality requires knowing what to examine and how to spot common defects. Visual inspections focus on alignment, finishes, and material consistency. Structural issues often reveal themselves through subtle signs that untrained eyes miss.
Common defects include framing mistakes that compromise load distribution, improper waterproofing that leads to mold growth, drywall cracks from poor joint compound application, and faulty electrical connections that create fire hazards. Recognizing these issues early prevents expensive repairs after project completion.

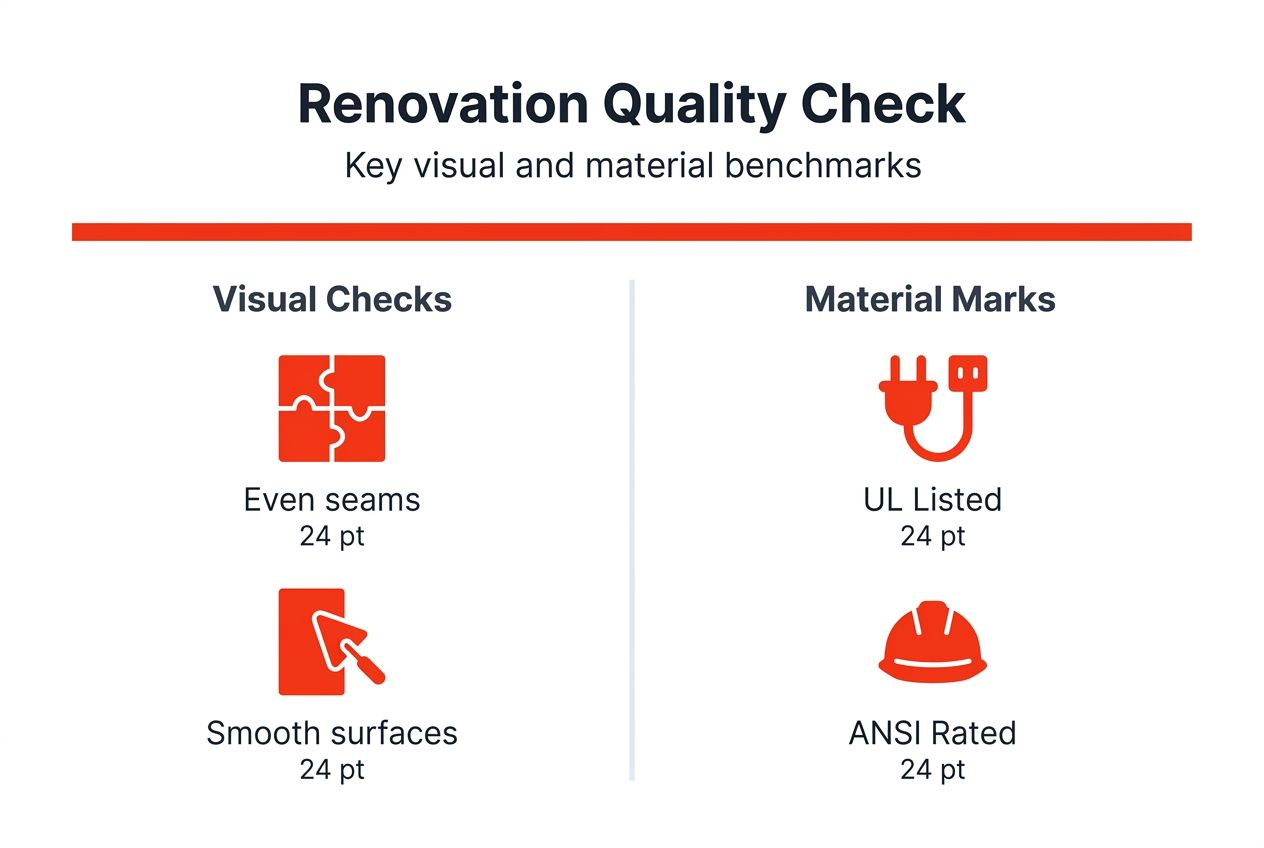
Material benchmarks help assess quality objectively. Look for durability ratings on flooring products, efficiency ratings on windows and appliances, and certification marks from recognized testing organizations. Cost-effective solutions don’t mean sacrificing quality when you choose materials with proven performance records.
| Defect Type | Quality Indicator | Inspection Method |
|---|---|---|
| Framing alignment | Walls plumb and square within 1/4 inch per 8 feet | Level and measuring tape |
| Drywall finish | Smooth surface with invisible joints | Angled lighting inspection |
| Paint application | Even coverage without drips or missed spots | Visual scan from multiple angles |
| Flooring installation | Consistent gaps and no lippage between tiles | Straightedge and gap gauge |
| Electrical boxes | Flush mounting with secure wire connections | Visual check and gentle tug test |
Pro Tip: Use a bright flashlight held at a low angle along walls and ceilings to reveal surface imperfections invisible under normal lighting. A moisture meter helps detect wet areas behind finished surfaces that signal plumbing leaks or inadequate waterproofing.
Tactile inspections complement visual assessments. Run your hand along joints and seams to feel inconsistencies. Press gently on newly installed tile or countertops to check for hollow spots that indicate poor adhesion. Open and close doors and windows repeatedly to verify smooth operation without binding or gaps.
Understanding remodeling services available in Illinois helps you set realistic quality expectations for different project types. Kitchen renovations demand different quality markers than bathroom remodels or basement finishing. Each space has unique requirements that affect inspection priorities.
Material certification marks provide quality assurance. Look for UL listings on electrical components, ANSI ratings on plumbing fixtures, and ASTM standards compliance on building materials. These third-party certifications verify products meet safety and performance benchmarks.
Budgeting properly allows room for quality materials and skilled labor. Cutting costs too aggressively often results in inferior products or rushed installation that compromises durability. Balance your budget priorities by investing more in structural elements and high-use areas while economizing on purely aesthetic features.
Common misconceptions about renovation quality
Many homeowners operate under dangerous assumptions about renovation quality assurance. These misconceptions leave you vulnerable to substandard work and costly surprises.
70% of homeowners misunderstand that contracts alone assure workmanship quality, creating a false sense of security that prevents proactive inspection and verification steps.
Signing a renovation contract establishes expectations but doesn’t guarantee flawless execution. Contracts specify what work should be done but can’t ensure how well contractors perform it. You must verify quality through inspections and oversight throughout the project.
Lower project prices often signal quality compromises. Contractors who bid significantly below competitors typically cut corners through inferior materials, rushed installation, or unlicensed subcontractors. The cheapest bid rarely delivers the best value. Focus on reasonable pricing that reflects quality materials and skilled labor rather than seeking the absolute lowest cost.
Skipping post-completion inspections creates risk. Many defects only become apparent during use or after seasonal changes affect the structure. Final walkthroughs should happen before making final payment, giving you leverage to address issues before contractors move to their next job.
Key misconceptions include:
- Believing permit approval guarantees perfect workmanship beyond code minimums
- Assuming contractor insurance covers all potential quality issues and defects
- Thinking warranties eliminate the need for thorough inspection before acceptance
- Expecting contractors to voluntarily disclose their own mistakes without prompting
Clearing these misconceptions empowers proactive quality management. You become an informed client who asks tough questions, verifies credentials thoroughly, and maintains oversight throughout the renovation. This approach dramatically reduces your risk of discovering problems after contractors finish and leave.
Understanding these realities helps you balance trust with verification. Most contractors deliver quality work, but your vigilance ensures standards are met consistently. Think of yourself as a quality control partner rather than a passive customer waiting for completion.
How to choose and verify reliable contractors in Illinois
Selecting the right contractor is your first defense against quality issues. Thorough vetting reduces risk dramatically compared to hiring based on price alone or casual recommendations.
Verify contractors hold valid Illinois state licenses appropriate for your project scope. The Illinois Department of Financial and Professional Regulation maintains searchable databases where you can confirm license status, issue dates, and any disciplinary actions. Don’t accept verbal assurances without independent verification.
Insurance verification protects you from liability if workers get injured on your property or if work causes damage. Require certificates of liability insurance and workers’ compensation coverage. Contact the insurance provider directly to confirm policies remain active and cover the dates of your project.
Research reputation through multiple channels. Check reviews on Google, Yelp, and specialized contractor platforms. Request references from recent clients with similar project types. Contact the Better Business Bureau to review complaint history and resolution patterns. Multiple positive data points across sources indicate reliability.
Follow these steps to vet contractors thoroughly:
- Request detailed written estimates from at least three licensed contractors
- Verify license status through official Illinois databases
- Confirm insurance coverage by contacting providers directly
- Check references and ask specific questions about quality, timeline, and communication
- Review online ratings across multiple platforms for consistent patterns
- Examine sample contracts for clear terms on materials, timelines, and payment schedules
- Meet contractors in person to assess professionalism and communication style
Pro Tip: Confirm insurance validity dates extend beyond your project’s anticipated completion. Policies sometimes expire mid-project, leaving you exposed if incidents occur near the end.
Documented communication creates accountability throughout your project. Request estimates in writing with specific material brands, quantities, and labor descriptions. Save all emails, text messages, and change orders. Photograph work in progress regularly to document quality and completion status at each phase.
Clear communication prevents disputes before they escalate. Discuss quality expectations explicitly during initial meetings. Ask contractors how they handle mistakes or unsatisfactory work. Their responses reveal whether they take ownership of problems or deflect responsibility.
Establishing communication protocols helps projects run smoothly. Agree on update frequency, preferred contact methods, and decision-making processes for unexpected issues. Regular check-ins keep you informed and let you address concerns while corrections remain simple and inexpensive.
DIY vs. professional inspection: What homeowners need to know
Deciding between self-inspection and hiring professionals depends on your experience, project complexity, and budget constraints. Each approach offers distinct advantages and limitations.
DIY inspections cost nothing beyond basic tools but rely on your knowledge and ability to spot problems. You can inspect frequently without scheduling conflicts, catching issues as they develop. However, you lack the training to identify subtle defects or assess structural concerns accurately.
Professional third-party inspections provide expert assessments at critical renovation phases. Licensed inspectors understand building codes deeply and recognize problems invisible to untrained observers. Their reports document issues objectively, giving you leverage when requesting corrections from contractors.
| Factor | DIY Inspection | Professional Inspection |
|---|---|---|
| Cost | Free except basic tools | $300-$800 per inspection |
| Expertise level | Limited to your knowledge | Trained professional standards |
| Defect detection | Surface issues only | Hidden and structural problems |
| Code compliance | Basic understanding | Thorough regulatory knowledge |
| Documentation | Informal notes and photos | Detailed reports with recommendations |
| Contractor accountability | Limited leverage | Official third-party validation |
Consider these factors when choosing your approach:
- Project complexity and structural changes increase professional inspection value
- Your construction knowledge and renovation experience affect DIY effectiveness
- Budget constraints may limit professional inspection frequency
- Contractor reputation and track record influence oversight needs
- Local code requirements sometimes mandate professional inspections
Hybrid approaches balance cost and quality assurance. Handle routine visual inspections yourself while hiring professionals for critical phases like foundation work, framing completion, and final walkthrough. This strategy maximizes your oversight while controlling costs.
First-time renovators benefit most from professional inspections. The investment teaches you what quality looks like while protecting against expensive mistakes. Experienced homeowners tackling minor updates may manage adequately with DIY oversight for straightforward projects.
Renovation estimates should include inspection costs in your overall budget. Factor professional inspections into initial planning rather than treating them as optional extras. This ensures adequate funds remain available when you need expert assessments most.
Timing professional inspections strategically maximizes value. Schedule them before contractors cover work that becomes inaccessible later. Post-drywall inspections can’t assess framing quality or verify proper electrical rough-in behind finished walls.
When and how to inspect during renovation phases
Staged inspections catch problems when corrections remain simple and affordable. Timing matters as much as thoroughness because many defects become irreversible once subsequent work conceals them.
Key inspection phases align with major project milestones. Each phase reveals different quality aspects and requires specific attention to prevent cascading problems in later stages.
Schedule inspections at these critical points:
- Foundation and framing completion: Verify structural elements meet code requirements before insulation and drywall hide them. Check for proper joist spacing, adequate support beams, and correct rough opening dimensions.
- Rough-in utilities: Inspect electrical wiring, plumbing pipes, and HVAC ductwork before walls close. Confirm outlets and fixtures locate correctly per plans. Test rough plumbing for leaks.
- Insulation installation: Ensure proper R-values, complete coverage without gaps, and correct vapor barrier placement before drywall installation begins.
- Drywall and finishing: Examine seam quality, corner bead installation, and surface smoothness before painting starts. Address imperfections while correction remains straightforward.
- Final walkthrough: Test all systems, verify finish quality, and confirm punch list items before making final payment. Operate every switch, fixture, door, and window.
Early inspections prevent hidden defects from becoming expensive nightmares. Framing mistakes discovered after drywall installation require extensive demolition to access and correct. Plumbing leaks found during rough-in inspection cost pennies compared to water damage repairs after occupancy.
Maintain detailed inspection documentation throughout your project. Photograph each phase from multiple angles before contractors cover work. Date photos and organize them by room and system. Notes should describe what you observed and any concerns you raised.
Documentation serves multiple purposes beyond quality assurance. It creates a visual record for insurance claims if problems develop later. It helps future renovations by showing what exists behind finished surfaces. It provides evidence if disputes require resolution through arbitration or legal action.
Renovation stages proceed logically from demolition through completion. Understanding this sequence helps you schedule inspections at moments when specific quality factors become visible and verifiable.
Coordinate inspection timing with your contractor’s schedule. Give advance notice so work reaches appropriate stopping points for assessment. Rushing inspections while contractors wait to proceed increases pressure and reduces thoroughness. Build inspection time into project schedules explicitly.
Weather affects inspection effectiveness for exterior work. Schedule roof and siding assessments during dry conditions when leaks and water penetration issues reveal themselves clearly. Avoid inspecting freshly poured concrete during freezing temperatures when curing conditions mask potential problems.
How First Solution IL supports quality home renovations in Illinois
Achieving renovation quality requires both knowledge and reliable execution partners. First Solution IL brings proven expertise to residential projects throughout Illinois, helping homeowners transform spaces with confidence.

Their approach aligns with the inspection best practices covered in this guide. Projects follow structured workflows that build in quality checkpoints at each phase. This systematic process reduces defects while keeping renovations on schedule and within budget.
Homeowners exploring interior remodeling examples see how quality craftsmanship translates into finished spaces that exceed expectations. From kitchen transformations to bathroom updates, their portfolio demonstrates attention to detail that survives daily use for years.
The step-by-step renovation process provides transparency from initial consultation through final walkthrough. Clear communication throughout keeps you informed and involved without overwhelming you with unnecessary technical details.
Exploring their full range of professional services reveals capabilities spanning flooring installation, door replacement, and complete interior and exterior remodeling. This breadth allows comprehensive project management under one contractor rather than coordinating multiple specialists.
Partnering with experienced professionals who prioritize quality gives you peace of mind throughout your renovation journey. Connect with First Solution IL to discuss how their expertise can bring your vision to life while maintaining the standards covered in this guide.
What are the top questions homeowners ask about inspecting renovation quality?
When should I schedule inspections during my home renovation?
Schedule inspections after major phases complete but before subsequent work covers them. Critical points include post-framing, after rough-in utilities, following insulation, and before final payment. This timing catches defects when corrections remain straightforward and affordable.
How can I verify if my contractor is licensed and insured in Illinois?
Check license status through the Illinois Department of Financial and Professional Regulation’s online database. For insurance, request certificates directly from contractors and call their insurance providers to confirm active coverage dates match your project timeline. Never rely on verbal assurances alone.
What are the most common defects to watch for during renovation?
Watch for framing misalignment, improper waterproofing in wet areas, visible drywall seams and cracks, uneven flooring with lippage between tiles, and electrical boxes not flush with wall surfaces. Use angled lighting and tactile inspection to reveal issues invisible under normal viewing conditions.
Can I rely solely on visual DIY inspections?
DIY inspections catch surface problems but miss hidden structural and code compliance issues. They work for simple projects if you have construction knowledge. Complex renovations involving structural changes, major systems, or high-value investments benefit significantly from professional third-party inspections at critical phases.
Why are staged third-party inspections beneficial?
Professional inspectors identify problems before contractors cover them with subsequent work. They understand code requirements deeply and recognize subtle defects homeowners miss. Their documentation provides objective evidence when requesting corrections and protects your investment by ensuring quality standards throughout rather than just at project end.